Open OnDemand: Difference between revisions
| Line 17: | Line 17: | ||
[[File:Play_icon.png|frameless|30px|link=https://mediasite.video.ufl.edu/Mediasite/Play/4654bfa838624de894085bf54678848f1d]] [5 min, 11 sec] | [[File:Play_icon.png|frameless|30px|link=https://mediasite.video.ufl.edu/Mediasite/Play/4654bfa838624de894085bf54678848f1d]] [5 min, 11 sec] | ||
This video covers the use of Open on Demand https://openondemand.org/ on HiPerGator via https://ood.rc.ufl.edu/. | This video covers the use of Open on Demand https://openondemand.org/ on HiPerGator via https://ood.rc.ufl.edu/. | ||
# Connect to https://ood.rc.ufl.edu/ | |||
# Launch a terminal | |||
# Launch many graphical applications like Rstudio, Matlab and Freeview | |||
# Manage job submission | |||
# Upload, download and edit files via your browser | |||
==Navigating OnDemand Menus== | ==Navigating OnDemand Menus== | ||
Revision as of 20:32, 18 January 2023
This page provides getting started information for using Open OnDemand to access HiPerGator. Open OnDemand is setup to provide a web interface to starting and attaching to HiPerGator jobs and it supports GUI programs, Job Status, and other interactions with HiPerGator via seamless connections through web browsers. This service is available at the following URL:
For questions or support, please open a support request with [OnDemand] in the subject.
Getting started video
Please watch our introductory video here:
Using Open on Demand on HiPerGator
![]() [5 min, 11 sec]
This video covers the use of Open on Demand https://openondemand.org/ on HiPerGator via https://ood.rc.ufl.edu/.
[5 min, 11 sec]
This video covers the use of Open on Demand https://openondemand.org/ on HiPerGator via https://ood.rc.ufl.edu/.
- Connect to https://ood.rc.ufl.edu/
- Launch a terminal
- Launch many graphical applications like Rstudio, Matlab and Freeview
- Manage job submission
- Upload, download and edit files via your browser
To Navigate the basic functions of OnDemand, first login to https://ood.rc.ufl.edu

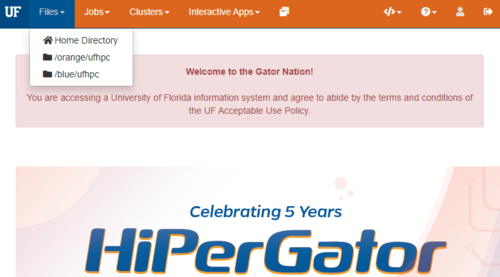
Once you access the dashboard, you can use the top menus to navigate.
|
Files
Jobs
Clusters
|
Interactive Apps My Interactive Sessions Help Logout |
Starting an Interactive application
To start an interactive application, first select the application you would like to start from the "Interactive Applications menu". Then you will see a form with the SLURM options available for that application. Fill in the fields with the resources you would like allocated for this application session.
General Form Fields
Version: Select the application version This defines the version of the application you want to load.
- Number of MPI Tasks (--ntasks): recommended default, 1
- Number of CPU cores requested per MPI task (--cpus-per-task, -p): recommended default, 1
- Maximum memory requested for this job in Gigabytes (--mem, -m): recommended default, 1
- Note: If you are using advanced memory options in Additional SLURM Options below, then leave this blank.
- SLURM Account (--account, -A): recommended default, (leave blank)
- QoS (Required if custom Account is set, --qos, -q): recommended default, (leave blank)
- Time Requested for this job in hours (--time, -t): recommended default, 1
- Cluster partition (--partition, -p): Recommended default, (default)
- Generic Resource Request (--gres): Recommended default, (leave blank)
Additional SLURM Options: Recommended default, (leave blank)
You can have multiple copies of the same application running at the same time by submitting the form multiple times.
Then select "Launch" to submit your job request.
Display Environment on the Console
You can use the "Console" Interactive application from the OOD menu to get a console session enabled with the frame-buffer. To do this:
- login to https://ood.rc.ufl.edu
- Select the "Console" Application
- Interactive Apps -> Console
- Fill in the form with your job resource request (please make sure to ask for at least 4 GB of RAM to make sure you have enough to render the frame buffers) and then select "Launch" at the bottom of the form. For specific parameters, see the Open OnDemand Access page
- Select "Launch Console" from the "My Interactive Sessions" page once your job starts.
This console session will open in your web browser and will have both the DISPLAY variable set and the X11 server started.
Connecting to an Interactive application
Once a job has started, you can connect using the "My Interactive Applications" menu.
- Select this menu and you will see a connection box for each application you have running and pending.
- Once the job starts, a Launch (App Name) icon will appear.
- Select this link to open a new browser window connecting you to your application.
Connecting to a HWGUI application
To use the hardware accelerated resources with your interactive sessions, please select the hwgui partition from the partition list when submitting your job resource form.
Additionally, many applications that require hardware acceleration by default have been added under the HWGUI Apps section of the Interactive Apps menu.
Job Connect Card

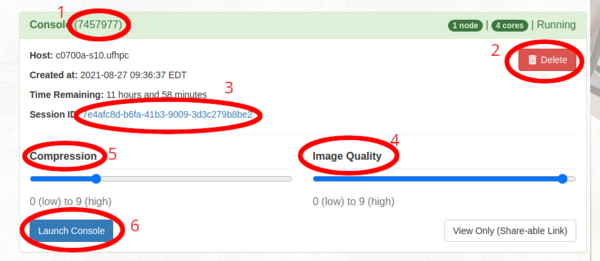
This section outlines several of the key features of the job connect card:
- JobID: This is the SLURM JobID for this job
- Delete: This will cancel a running job, (or delete the session if the job has already ended)
- OOD Session ID: This is the unique identifier for the OOD session for this job, can be clicked to bring up the OOD log directory for troubleshooting
- Image Quality: This setting controls the quality of the visual interface at the source, use a lower setting for slower internet connections
- Compression: This setting adjusts the amount of CPU based compression used for the NoVNC connection, use higher settings for slower connections but note it will increase CPU usage on both the job and client
- Launch Button: Click this button to connect to your running job in a web-browser session