Difference between revisions of "Jupyter Notebooks"
| Line 25: | Line 25: | ||
====Select the Desired Resources from the Dropdown ==== | ====Select the Desired Resources from the Dropdown ==== | ||
| − | * | + | * The dropdown menu lists the available job profile options for the resource request for your Jupyter Server. As with all jobs run through the scheduler, these resources are the number of CPU cores, amount of memory (RAM), number of GPUs and the time these resources are allocated for. |
* Be sure to select reasonable resources for the work you plan to do and the allocation your group has. Once allocated to your job, those resources are unavailable to other users in your group for the duration of your job. | * Be sure to select reasonable resources for the work you plan to do and the allocation your group has. Once allocated to your job, those resources are unavailable to other users in your group for the duration of your job. | ||
* After selecting the profile you want to use, click the start button. | * After selecting the profile you want to use, click the start button. | ||
| − | |||
* After clicking Start, your job is submitted to the SLURM scheduler requesting the resources indicated. It may take a few minutes or longer for your job to start depending on cluster load and your group's available resources. | * After clicking Start, your job is submitted to the SLURM scheduler requesting the resources indicated. It may take a few minutes or longer for your job to start depending on cluster load and your group's available resources. | ||
Revision as of 20:18, 26 October 2022
Available Options for Starting and Connecting to a Jupyter Notebook Server

Jupyter Notebooks are a popular web-based development environment for teaching, testing and development and running code. Notebooks allow seamless integrations of live code, richly formatted text, images, visualizations, cleanly formatted equations and more. Jupyter supports many programming languages, but is most often associated with Python.
UF Research Computing offers several methods to run Jupyter. This page provides general information about Jupyter, Jupyter Notebooks and Jupyter Lab. For details on starting Jupyter on HiPerGator, please see the pages below for detailed information on each option. In general, these options are listed in the order of ease of use.
JupyterHub
If you are looking for a convenient way to run JupyterLab notebooks try UFRC JupyterHub service. It presents a convenient web interface to start notebooks, consoles, or terminals with multiple custom kernels and several job resource request profiles, which we can expand on request to satisfy your needs.
- The main user impact is that if this occurs, you will need to force a reload of the page to stop your server.
- To force a hard reload of the JHub webpage: use shift+F5 or hold the shift key on the keyboard and click on the reload browser button)
- After a reload, you will see your username in the top-right corner and be able to stop your server
Connect to https://jupyterhub.rc.ufl.edu
- Using your web browser navigate to https://jupyterhub.rc.ufl.edu and login with your institutional credentials.
Select the Desired Resources from the Dropdown
- The dropdown menu lists the available job profile options for the resource request for your Jupyter Server. As with all jobs run through the scheduler, these resources are the number of CPU cores, amount of memory (RAM), number of GPUs and the time these resources are allocated for.
- Be sure to select reasonable resources for the work you plan to do and the allocation your group has. Once allocated to your job, those resources are unavailable to other users in your group for the duration of your job.
- After selecting the profile you want to use, click the start button.
- After clicking Start, your job is submitted to the SLURM scheduler requesting the resources indicated. It may take a few minutes or longer for your job to start depending on cluster load and your group's available resources.
Stopping Your Server When Finished

If you are done with your work, rather than leaving the server running with idle resources tied up with your job, please stop your server.
- From the File menu, select Hub Control Panel
- As noted above, there is a caching bug in JupyterHub that may result in you having a different user's username in the top right of the page. If that is the case, do a hard refresh of the page.

- After verifying your username, click the Stop My Server button.
Video Summary of Running Jupyter Notebooks on HiPerGator
![]() [8 min, 1 sec]
This video covers the use of Jupyter Notebooks via https://jhub.rc.ufl.edu/ to run Python, R and other notebooks on HiPerGator.
[8 min, 1 sec]
This video covers the use of Jupyter Notebooks via https://jhub.rc.ufl.edu/ to run Python, R and other notebooks on HiPerGator.
- Connect to https://jhub.rc.ufl.edu/
- Launch notebooks in various coding languages
- Launch a terminal
- Upload and download files via your browser
Jupyter via Open OnDemand
Open OnDemand is a service that provides web-based access to HiPerGator, including JupyterLab and Jupyter Notebooks.
Connect to https://ood.rc.ufl.edu
- Using your web browser navigate to https://ood.rc.ufl.edu/ and login with your GatorLink credentials.
- See the Open OnDemand for information on file management, shell access and other features available from Open OnDemand.
Select Jupyter Notebook from the interactive Apps Menu and fill out form
- From the Interactive Apps menu, select Jupyter Notebook from the Servers section of the menu near the bottom.

- The next page presents a form with many options for scheduling your job.


- Settings of particular importance:
- Number of CPU cores requested per MPI task (--cpus-per-task, -p): How many CPU cores do you want? Most Python Notebooks will only use a single CPU core, so requesting more is generally not needed. If you are using multiple cores, set the number here.
- Maximum memory requested for this job in Gigabytes (--mem, -m): How much memory should be allocated to your job. This should be a reasonable estimate of the amount of memory (RAM) that you will use during your session in GB. If you experience Jupyter Kernels dying while running your notebooks, this may be an indication of not having enough memory. Restarting a session with more RAM may help.
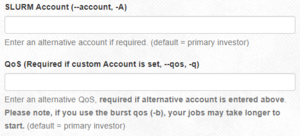
- SLURM Account (--account, -A) and QoS (Required if custom Account is set, --qos, -q): Account and QOS can be set to use a secondary group (such as a course allocation). Most users will not need to change these settings.
- Cluster partition (--partition, -p): Leave as
defaultunless are requesting a GPU or have a specific reason to select a partition. - Generic Resource Request (--gres): If you are requesting a GPU, add the information here using the GPU Access page as a guide.

Once you have used Open OnDemand once, your settings will typically be saved for future sessions. If you run similar sessions, you can scroll to the bottom and click Launch.
Wait for job to start and then connect
- After clicking Launch, your job will be submitted to the SLURM scheduler requesting the resources you have selected. At first the job will be listed with the image below. Remember that resources are allocated to groups based on investment, other jobs using the group's resource may delay the start of your job.

- Once your job starts the Connect button will appear. Click that to connect to your Jupyter session.
Reconnecting to Running Sessions
You can close your browser window and reconnect to existing sessions using the My Interactive Sessions menu (sometimes shown with just the icon on smaller screens).

Deleting Running Sessions
Your Jupyter session will run for the time you selected, consuming the allocated resources. If you are finished with your analyses, you can release those resources by deleting the job. Using the My Interactive Sessions menu shown above, find the session and click the Delete button. The Delete button stops the SLURM job. The Notebooks/files/etc. created in your job are not deleted.

Using the Older Jupyter Notebook Interface

By default, the checkbox show at the right is selected, starting your server with the more modern JupyterLab interface. If you want to use the older, simpler Jupyter Notebook interface uncheck the box.
Batch job submission
Note: This is a manual method of starting Jupyter session as listed on the Main Jupyter RC documentation.
Standalone Jupyter Notebook
Start a Jupyter notebook within a SLURM job on HiPerGator and connect to it from the web browser running on your local computer.
Note: Starting with jupyter/5.7.0 we are providing custom kernels named as 'RC-py3-$version' and 'RC-R-$version' that provide access to the default python3 and R environment modules in addition to standard built-in python and R kernels that come with Jupyter. Use the RC kernels if you'd like to access over 900 R packages and over 300 python3 modules we installed to support exploratory research and code writing by UF researchers. As always, use https://support.rc.ufl.edu to request package or module installs. Note that the shared python3 and R environments can only have one package/module version to avoid conflicts. Use python virtualenv to have custom module installs for particular projects.
If you would like to define your own kernel(s) put their directories into ${HOME}/.local/share/jupyter/kernels. You also need to make sure to install the 'ipykernel' package in your conda environment.
Interactive Session
If you're in a dev SLURM session then
- Note the host name, which you'll need to create an SSH tunnel to your notebook.
- Load jupyter module.
- Start a jupyter notebook with launch_jupyter_lab or launch_jupyter_notebook. Note the information printed to the console.
- Create an SSH tunnel from your local computer to the notebook using SSH forwarding (see below).
SLURM Job
If you would like a notebook to live for longer than the 12-hour time limit for dev sessions start it inside a SLURM job.
- If you don't want to go through copying/pasting the initial authentication token for every jupyter job set a default password for your notebooks with the following commands
module load jupyter
jupyter-notebook password
- Create a job script similar to the example below. Adjust options as necessary.
#!/bin/bash
#SBATCH --job-name=jupyter
#SBATCH --output=jupyter_notebook_%j.log
#SBATCH --ntasks=1
#SBATCH --mem=2gb
#SBATCH --time=04:00:00
date;hostname;pwd

module add jupyter

launch_jupyter_notebook
- Note
- The jupyter environment includes all R and python packages/modules we installed on request.
Connection Information
Once the job starts look at the jupyter_notebook_$SLURM_JOBID.log SLURM output file to learn the hostname and the port jupyter notebook was started on. The ssh tunnel and local URI paths should already be there.
E.g.
$ cat jupyter_6595668.log
Fri Apr 14 16:22:02 EDT 2017
c10b-s14.ufhpc
/home/jdoe

Starting Jupyter Notebook on port 23312 on the c10b-s14.ufhpc server.

SSH tunnel command:
        ssh -NL 23312:c10b-s14.ufhpc:23312 jdoe@hpg.rc.ufl.edu

Local browser URI:
        http://localhost:23312
If you have not set a default personal password with 'jupyter-notebook password' you will need to find and use the automatically generated authentication token, which is written to the job log once the notebook server starts. For example,
E.g.
[W 15:38:37.568 NotebookApp] WARNING: The notebook server is listening on all IP addresses and not using encryption. This is not recommended.
[I 15:38:38.859 NotebookApp] Serving notebooks from local directory: /home/jdoe
[I 15:38:38.859 NotebookApp] The Jupyter Notebook is running at:
[I 15:38:38.859 NotebookApp] http://(c100b-s41.ufhpc or 127.0.0.1):29926/?token=06b1c3f73bb847234c198a22bd62b7f20101b04d1bc2b64a
[I 15:38:38.859 NotebookApp] Use Control-C to stop this server and shut down all kernels (twice to skip confirmation).
[C 15:38:38.862 NotebookApp]

    Copy/paste this URL into your browser when you connect for the first time,
    to login with a token:
        http://(c100b-s1.ufhpc or 127.0.0.1):29926/?token=06b1c3f73bb847234c198a22bd62b7f20101b04d1bc2b64a
[I 15:39:09.643 NotebookApp] 302 GET / (172.16.206.12) 0.53ms
[I 15:39:09.648 NotebookApp] 302 GET /tree? (172.16.206.12) 0.66ms
[I 15:39:37.821 NotebookApp] 302 GET /?token=06b1c3f73bb847234c198a22bd62b7f20101b04d1bc2b64a (172.16.206.12) 0.37ms
[I 15:39:46.069 NotebookApp] Creating new notebook in
[I 15:40:05.840 NotebookApp] Kernel started: b5d6cea6-d214-4b37-b01e-4250ae6179c9
[I 15:40:13.516 NotebookApp] Adapting to protocol v5.0 for kernel b5d6cea6-d214-4b37-b01e-4250ae6179c9
Copy the token to use it as the password the first time you connect to the notebook. In this example the token is 06b1c3f73bb847234c198a22bd62b7f20101b04d1bc2b64a.
Create Tunnel From Local Machine
Copy paste the tunnel command from the job script or write your own based on how you manually started a notebook.
ssh -NL 23312:c10b-s14.ufhpc:23312 jdoe@hpg.rc.ufl.edu
Browse To Notebook
In a web browser on the local machine open http://localhost:23312
Provide the personal password or the token from the job log as the password to authenticate.
Enjoy using the rich python programming and visualization environment provided by Jupyter running on UFRC computing resources.
Again, note that the default Jupyter Notebook setup you see should have at least four kernels - two default kernels (python and R) that come with Jupyter and two additional kernels that provide access to environments provided by RC-specific environment modules e.g. 'RC R-3.5.1' and 'RC Py3-3.6.5', which match the same environment modules you use in batch jobs.
Accessing Blue and Orange Directories
At first, Jupyter only has access to your home directory (/home/gatorlink). In order to access directories outside of your home, it is necessary to add links to those directories using the command line. These links are similar to aliases or shortcuts on your computer. Common directories to add are your groups' /blue and /orange directories.
Open a Terminal

We will need a terminal to run the commands below. You can use an ssh client, the OOD Shell Access or launch a Terminal within your Jupyter Server. The image on the right shows the Terminal Launcher button at the bottom of the Launcher panel in JupyterLab. If needed, you can open the Launcher with the '+' icon in the top left or from the File menu, select New Launcher.
Create the Link
The specific type of link we want to create is referred to as a symbolic link or symlink. The format of the command used to create this link is ln -s path_to_link_to name_of_link.
- In general, we recommend making a link to your group's directory. This allows you to use the group's share folder and more easily collaborate with others in the group than if you made the link to your own folder within the group directory.
- Since people are often in multiple groups, we recommend naming the link with the convention
blue_group. This allows for multiple links to each group directory. - The
idcommand will show you the groups you are a member of:
[agator@login4 ~]$ id
uid=12345(agator) gid=12345(gator-group) groups=12345(gator-group),12346(orange-group),12347(blue-group)
[agator@login4 ~]$
- The commands below show the commands needed to change directories to your home directory (
cd) and create links to the fictional gator-group/blueand/orangedirectories.
[agator@login4 ~]$cd
[agator@login4 ~]$ln -s /blue/gator-group blue_gator-group
[agator@login4 ~]$ln -s /orange/gator-group orange_gator-group
Then, you'll see 'blue_gator-group' or 'orange_gator-group' as a folders in your home directory in JupyterLab and will be able to double-click on those to browse the directories.
Exporting Notebooks as Executable Scripts
Notebooks are a great method for testing and development, but can be cumbersome when it comes to production runs. It is simple to export a Jupyter Notebook as an executable script (.py file for example).
- Select File > Export Notebook As... > Export Notebook to Executable Script.
Available Kernels
Note: We happily add python or R packages/modules to available environments/kernels. Use our support system to request package addition. All kernels are based on environment modules that can also be loaded in an interactive terminal session or in job scripts with 'module load MODULE'. Users can also install their own personal packages with methods described in the R FAQ section.
- 'Python3 VERSION (basic)' - the default python3 kernel from the jupyterhub install, which doesn't have much in it. You likely don't want to use it unless you pip install all modules you want to use yourself.
- 'Python3 VERSION (full)' - our main HiPerGator 'python' modules with "Everything and the kitchen sink" in them as far as python modules are concerned. 'Full' python kernels represents our major generic python environments for general-purpose work and development. Since packages can be installed or updated and their api can change do not rely on this environment for long-term project work if code stability is paramount.
- 'PyViz-0.10.0' - (pyviz module) Environment for https://pyviz.org/ based data analysis and plotting environment.
- 'R VERSION (full)' - (R modules) Main R environment module(s) from HiPerGator with everything and a kitchen sink as far as packages are concerned.
- Pytorch-VERSION and Tensorflow-VERSION kernels represent current stable versions of PyTorch and TensorFlow and all the package installed within those environments on request. We're happy to install more packages in those environments, but these are inherently more fragile than general python environments because ML/DL field is moving so fast and rife with incompatible packages. When you module load pytorch or tensorflow or use one of the kernels they will detect whether they are running in a CPU-only or a GPU environment end load the correct environment.
All other kernels are application-specific. Their installation requests are documented in our support system and on this help site.
Personal Kernels
Users can define their own Jupyter kernels for use in JupyterHub. See https://jupyter-client.readthedocs.io/en/stable/kernels.html
In short, kernel definitions can be put into ~/.local/share/jupyter/kernels directory. See /apps/jupyterhub/kernels/ for examples of how we define commonly used kernels. You can also copy a template kernel from /apps/jupyterhub/template_kernel. Replace the placeholder paths and strings in the template files run.sh and kernel.json in accordance to your conda environment configuration.
Note: Even though the kernel.json defines the display_name, the folder name must also be unique. You cannot just copy a folder and update the contents of the kernel.json and run.sh files, you also need to rename the folder.
To troubleshoot issues with personal kernels, check the log files at ~/ondemand/data/sys/dashboard/batch_connect/sys/jupyter/output/YOUR_SESSION_ID/output.log