Difference between revisions of "How To ResVault"
| (40 intermediate revisions by 4 users not shown) | |||
| Line 1: | Line 1: | ||
| − | [[Category: | + | [[Category:Essentials]] |
| − | __TOC__ | + | {|align=right |
| − | + | |__TOC__ | |
| − | + | |} | |
| + | ==Getting Started== | ||
| + | ===tiCrypt manual=== | ||
| + | The full documentation for tiCrypt software can be found at [https://ticrypt.com/docs/frontend2/getting-started tiCrypt.com]. | ||
| + | This page contains some specifics to use tiCrypt the way it runs at the University of Florida. | ||
===tiCrypt Connect Client Install/Update=== | ===tiCrypt Connect Client Install/Update=== | ||
| − | + | #If the client is already installed, ensure there are no instances of tiCrypt currently running by opening tiCryptConnect and selecting the "Shut down Connect" button to the right of the screen. If the client is not yet installed, proceed to Step 2. | |
| − | [[File:Rv- | + | #*[[File:Rv-update2.png|frameless]] |
| − | + | #If the client isn't starting or responding, you might need to stop the process manually. | |
| − | + | #*[[File:ProcessKill.png|frameless]] | |
| − | + | # Download the appropriate launcher for your operating system from the [https://www.rc.ufl.edu/documentation/hipergator-rv/hipergator-rv-download/ HiPerGator-RV Download page]. | |
| − | + | # Run the installer software for the tiCrypt Connect client and follow the prompts. | |
| − | + | # Once the installation is finished, run the client and check that the version number corresponds to the updated version. We recommend always using the latest deployment version, which is circled in the first image. | |
| − | |||
| − | |||
| − | |||
| − | |||
| − | |||
| − | |||
| − | |||
| − | |||
| − | |||
| − | [[File:ProcessKill.png|frameless | ||
| − | |||
| − | |||
| − | |||
| − | |||
| − | |||
| − | |||
| − | |||
| − | |||
| − | |||
| − | |||
| − | |||
| − | |||
| − | |||
| − | |||
| − | |||
| − | |||
| − | |||
| − | |||
| − | |||
| − | |||
| − | |||
| − | |||
| − | |||
| − | |||
| − | |||
| − | |||
| − | |||
| − | |||
| − | |||
| − | |||
| − | |||
| − | |||
| − | |||
| − | |||
| − | |||
| − | |||
| − | |||
| − | |||
| − | |||
| − | |||
| − | |||
| − | |||
| − | |||
| − | |||
| − | |||
| − | |||
| − | |||
===ResVault Login=== | ===ResVault Login=== | ||
| − | + | # Launch the tiCrypt Connect client, which will open a new tab on your Internet browser (http://127.0.0.1:8080/connect). | |
| + | # Click on the latest HyperGatorRV deployment or add a new deployment using the downloaded deployment file from Step 2 above. We recommend always using the latest deployment version. | ||
| + | # If you see a message saying "You have no keys loaded.", click on "LOAD KEY" and select the <filename>.key.json key file. | ||
| + | # Enter your RV password (not your GatorLinkID password). | ||
| + | # Setup or access your virtual machine (VM) as described in the [https://www.rc.ufl.edu/documentation/hipergator-rv/hipergator-rv-training/ training sessions]. | ||
| − | 2. | + | ==VM Setup== |
| + | <div style="column-count:2"> | ||
| + | Data stored in My Vault can be processed with the RV VM. Windows and Linux options are available. <br> | ||
| + | [[File:RV INST 1.png|right|frameless|]] | ||
| + | Follow these steps to set up a VM: | ||
| − | + | ===Setup Drives=== | |
| + | # Click on the Virtual Machines main tab and then click on Drives. | ||
| + | # Add a drive and set up two drives: a Home and a Data drive. Users should specify which drives need backup. | ||
| + | # Setup the Home data. It should be at least 10 GB. | ||
| + | # Select the Team, Production Realm, and "Default".<br><br><br><br><br><br> | ||
| − | + | ===Setup VM=== | |
| + | # Navigate to the Virtual Machines management tab and click on the "+" button next to the search bar. | ||
| + | # Select the appropriate type of VM, including the operating system, under Basic Info. | ||
| + | # Select the Drive. | ||
| + | #* Only Read-Only drives can share data with the share function. | ||
| + | #* You can save data in the default C:\ drive, but it will be wiped out at the end of every session. Therefore, creating a "Data" drive for storage in addition to the Vault is recommended. | ||
| + | # Confirm the VM settings. | ||
| + | # Launch the VM, if needed prompt to format the disk (fist time launch). | ||
| + | # You can monitor a process with the progress bar on the bottom right corner of the screen. | ||
| + | # You can share the VM with other users and give manager or user labels. This is only for users within the teams. | ||
| + | # Access directory management is used to grant permissions to specific drives/folders. Only VM owners can manage it. | ||
| + | # Connect by clicking on the Open button and follow the prompts. | ||
| + | </div> | ||
| − | + | ==Transfer Data from/to RV== | |
| + | For file management help, please visit the following resources: | ||
| + | [https://ticrypt.com/docs/frontend2/tiCrypt-frontend/user-role/vault/v-inbox-and-sftp Inbox and SFTP] | ||
| − | + | [https://ticrypt.com/docs/frontend2/tiCrypt-frontend/user-role/vault/v-file-directories/ ResVault Files Directories] | |
| − | |||
| − | |||
| − | |||
| − | |||
| − | |||
| − | |||
| − | |||
| − | |||
| − | |||
| − | |||
| − | |||
| − | |||
| − | |||
| − | |||
| − | |||
| − | |||
| − | |||
| − | |||
| − | a. | + | ==Software in ResVault== |
| + | As of April 2022, all HiPerGator software is available on Linux VMs under the /apps/ directory. You can load modules from a command line using the command <code>$ module load (AppName)</code>, or search for modules using <code>$ module spider (AppName)</code>. For a full list of available HiPerGator apps, please see [https://help.rc.ufl.edu/doc/Applications this page]. | ||
| − | + | ===Using RStudio in ResVault=== | |
| + | To launch RStudio on ResVault use the command <code>$ rstudio --no-sandbox</code> and if you have additional drives linked to your VM, bind mount those drives with the flag <code> -B /drives/drive_name</code> | ||
| − | + | If you have a specific software installation request, please contact our support team via the [http://www.my.it.ufl.edu Helpdesk]. | |
| − | + | ===[[How to run Jupyter on Linux VMs in ResVault|How to run Jupyter on Linux VMs in ResVault]]=== | |
| − | + | You can use the same kernels that are available on HiPerGator within ResVault VMs by following the steps outlined in [[How to run Jupyter on Linux VMs in ResVault|this guide]]. | |
| − | |||
| − | |||
| − | |||
| − | |||
| − | |||
| − | [[ | ||
| − | |||
| − | |||
| − | |||
| − | |||
| − | |||
| − | |||
| − | |||
| − | |||
| − | |||
| − | |||
| − | |||
| − | |||
| − | |||
| − | |||
| − | |||
| − | |||
| − | |||
| − | |||
| − | |||
| − | |||
| − | |||
| − | |||
| − | |||
| − | |||
| − | |||
| − | |||
| − | |||
| − | |||
| − | |||
| − | |||
| − | |||
| − | |||
| − | |||
| − | + | ==Drive Mangement== | |
| − | + | ===Transfer drive ownership from one user to another=== | |
| − | + | Transferring drive ownership allows a different user to be the VM owner. VMs cannot be transferred, but the drives mounted in the VMs can be. The process requires assistance from the ResVault administrators and cannot be completed by users alone. | |
| + | # Shut down any VMs with the drive(s) to be transferred mounted. | ||
| + | # In the Virtual Machine, Drives sub-panel, select the drive and click the Share icon. | ||
| + | # You need to share the drive with '''Read-Write Access'''. Start typing the name of the user you want to transfer the drive to and select the user from the list. | ||
| + | # Click Accept. | ||
| + | # Once the drive has been shared with the desired new owner, '''contact Research Computing support''' and request that drive ownership be transferred. | ||
| + | # Staff will transfer ownership, and the new owner can configure a VM using the drives that they now own and will be the owner of the VM. | ||
| + | # Old user will still have access to the drives. | ||
| − | + | ==Troubleshooting Issues== | |
| − | + | To address technical issues regarding ResVault, please review our [https://help.rc.ufl.edu/doc/ResVault_Troubleshooting Troubleshooting Page] or contact our support team via the [http://www.my.it.ufl.edu Helpdesk]. | |
| − | |||
| − | |||
| − | |||
| − | |||
| − | |||
Latest revision as of 20:01, 18 July 2023
Getting Started
tiCrypt manual
The full documentation for tiCrypt software can be found at tiCrypt.com. This page contains some specifics to use tiCrypt the way it runs at the University of Florida.
tiCrypt Connect Client Install/Update
- If the client is already installed, ensure there are no instances of tiCrypt currently running by opening tiCryptConnect and selecting the "Shut down Connect" button to the right of the screen. If the client is not yet installed, proceed to Step 2.
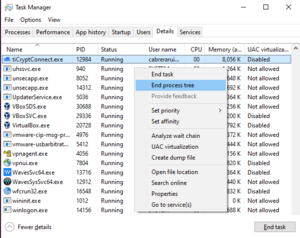
- If the client isn't starting or responding, you might need to stop the process manually.
- Download the appropriate launcher for your operating system from the HiPerGator-RV Download page.
- Run the installer software for the tiCrypt Connect client and follow the prompts.
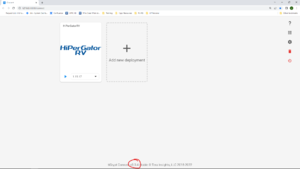
- Once the installation is finished, run the client and check that the version number corresponds to the updated version. We recommend always using the latest deployment version, which is circled in the first image.
ResVault Login
- Launch the tiCrypt Connect client, which will open a new tab on your Internet browser (http://127.0.0.1:8080/connect).
- Click on the latest HyperGatorRV deployment or add a new deployment using the downloaded deployment file from Step 2 above. We recommend always using the latest deployment version.
- If you see a message saying "You have no keys loaded.", click on "LOAD KEY" and select the <filename>.key.json key file.
- Enter your RV password (not your GatorLinkID password).
- Setup or access your virtual machine (VM) as described in the training sessions.
VM Setup
Data stored in My Vault can be processed with the RV VM. Windows and Linux options are available.
Follow these steps to set up a VM:
Setup Drives
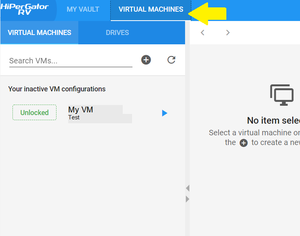
- Click on the Virtual Machines main tab and then click on Drives.
- Add a drive and set up two drives: a Home and a Data drive. Users should specify which drives need backup.
- Setup the Home data. It should be at least 10 GB.
- Select the Team, Production Realm, and "Default".
Setup VM
- Navigate to the Virtual Machines management tab and click on the "+" button next to the search bar.
- Select the appropriate type of VM, including the operating system, under Basic Info.
- Select the Drive.
- Only Read-Only drives can share data with the share function.
- You can save data in the default C:\ drive, but it will be wiped out at the end of every session. Therefore, creating a "Data" drive for storage in addition to the Vault is recommended.
- Confirm the VM settings.
- Launch the VM, if needed prompt to format the disk (fist time launch).
- You can monitor a process with the progress bar on the bottom right corner of the screen.
- You can share the VM with other users and give manager or user labels. This is only for users within the teams.
- Access directory management is used to grant permissions to specific drives/folders. Only VM owners can manage it.
- Connect by clicking on the Open button and follow the prompts.
Transfer Data from/to RV
For file management help, please visit the following resources:
Software in ResVault
As of April 2022, all HiPerGator software is available on Linux VMs under the /apps/ directory. You can load modules from a command line using the command $ module load (AppName), or search for modules using $ module spider (AppName). For a full list of available HiPerGator apps, please see this page.
Using RStudio in ResVault
To launch RStudio on ResVault use the command $ rstudio --no-sandbox and if you have additional drives linked to your VM, bind mount those drives with the flag -B /drives/drive_name
If you have a specific software installation request, please contact our support team via the Helpdesk.
How to run Jupyter on Linux VMs in ResVault
You can use the same kernels that are available on HiPerGator within ResVault VMs by following the steps outlined in this guide.
Drive Mangement
Transfer drive ownership from one user to another
Transferring drive ownership allows a different user to be the VM owner. VMs cannot be transferred, but the drives mounted in the VMs can be. The process requires assistance from the ResVault administrators and cannot be completed by users alone.
- Shut down any VMs with the drive(s) to be transferred mounted.
- In the Virtual Machine, Drives sub-panel, select the drive and click the Share icon.
- You need to share the drive with Read-Write Access. Start typing the name of the user you want to transfer the drive to and select the user from the list.
- Click Accept.
- Once the drive has been shared with the desired new owner, contact Research Computing support and request that drive ownership be transferred.
- Staff will transfer ownership, and the new owner can configure a VM using the drives that they now own and will be the owner of the VM.
- Old user will still have access to the drives.
Troubleshooting Issues
To address technical issues regarding ResVault, please review our Troubleshooting Page or contact our support team via the Helpdesk.


