Create SSH Keys Using Putty
| This article may require cleanup to meet UFRC standards. It's either outdated, has factual errors, has broken links, too terse, too verbose, or inappropriate for UFRC public wiki. |
An SSH key set-up can be divided into 4 steps:
- Prerequisite software
- Generating your keys
- Enabling Key Access to HPG
- Using Pageant to create persistent key sessions
Each of these are handled in a slightly different ways on each operating system. Separate instructions for Microsoft Windows OS variants are listed below.
Prerequisite software
Here is a list of the software you will need installed on your local machine to start using key-based authentication.
- An SSH client (PuTTY, MobaXterm etc)
- The Windows Putty Agent (pagent.exe)
- The command line interface (plink.exe)
You can find many of these to download at the putty site:
http://www.chiark.greenend.org.uk/~sgtatham/putty/latest.html
You can also find the MobaXterm client here:
http://mobaxterm.mobatek.net/
Most of these software applications are contained in the Windows installer (.msi) for PuTTY and that is the recommended approach. If you do not have administrative authority on your PC you can also download a zip file containing all the needed programs. These will need to be extracted into a folder of your choosing. MobaXterm also contains a similar key generator and can be used in place of PuTTYgen if it is already installed.
Generating your keys
Now we can generate your key pair. Your key pair consists of two keys, one public and one private. The public key is the one that you will upload to HPG. The private key must be kept secure. Once enabled, this key will allow you to login to HPG directly, so it needs to be stored in a safe place. Treat it as you would treat your HiPerGator or GatorLink password and remember the consequences of facilitating unauthorized access to University systems.
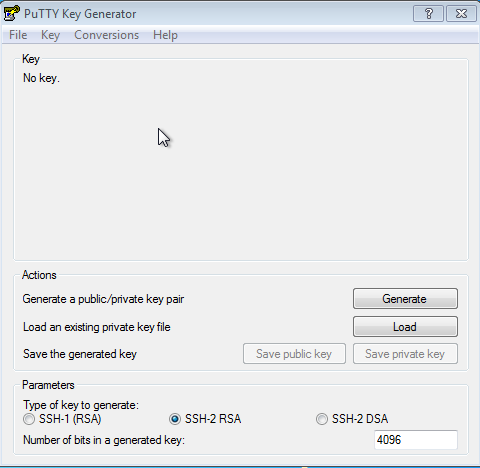
To generate your key pair, start the PuTTYgen program. Please see the figure below for an example window. If you are using MobaXterm, then select “Tools" then “MobaKeyGen".
Please make sure to select and enter the following options in the lower “Parameters" box: SSH-2 RSA (simply RSA in MobaKeyGen) and 4096 for the number of bits in a generated key.
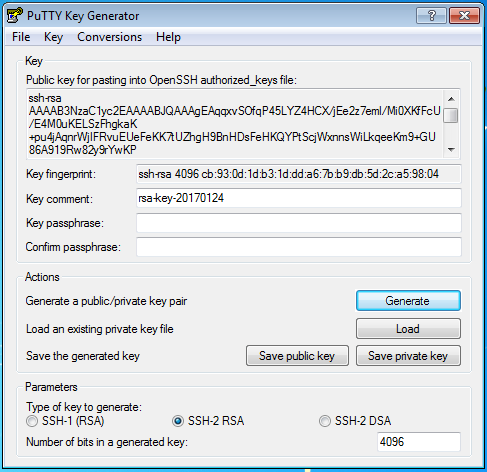
Then click “Generate" to create your key pair. You will be asked to move the mouse around in a random pattern over the window to generate randomness for the key. This may take a bit of time depending on the speed of your computer. Once completed, the public key will be displayed in the “Key" box. The figure below shows what the window looks like after key generation.
Feel free to edit the “Key Comment" field to give your key a nickname. Then protect your private key with a passphrase. PLEASE DO NOT SKIP THIS STEP!
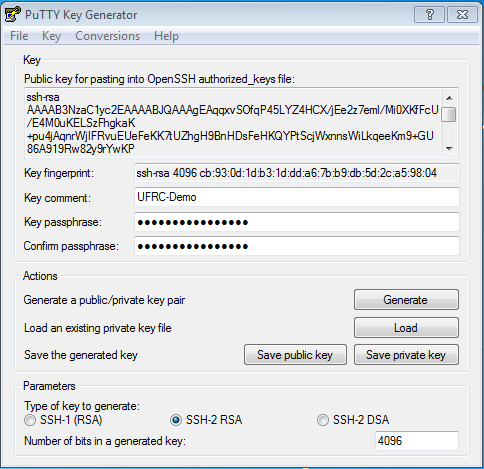
- Please protect your private key with a strong passphrase. This is what protects your key from other customers and intruders if they ever manage to compromise your system. The figure below shows what the window should look like with the information filled out.
Please choose a passphrase that is easy for you to remember, but hard for another person to guess. If you need resources to help with generating passphrases, please see: http://identity.it.ufl.edu/process/gatorlink/password-tips/
Once your passphrase is set, you can use the “Save private key" and “Save public key" buttons to save your keys. Please make sure to save these in a safe place. The private key should be a “.ppk" file and the public key can be a regular text file “.txt".
By default, the PuTTYgen program converts the key for pasting into an OpenSSH file in the “Key" area of the screen. This is the content you should copy to add to HPG. If you ever need to copy this content again, just click the “Load" button and select your private key file.
Enabling Key Access to HPG
In order to enable key-based login to HPG, you will need to copy the public key content from the PuTTYgen window into your authorized_keys file on HPG. To do this you will need to login to HPG using your account. You can use any SSH client for this step, but for this tutorial, we will be using MobaXterm. Go ahead and start your SSH client and log in to hpg2.rc.ufl.edu with your username and password. You should see a command prompt in your home directory. To do this in MobaXterm, simply start the application, click “Start local terminal", and type the following (with your GatorLink username in place of $GATORLINK) followed by the enter key as shown in the figure below:
ssh $GATORLINK@hpg2.rc.ufl.edu
MobaXterm connection window with HPG2 login command
The next figure shows the login prompt after authentication:
Now you can open and edit your authorized_keys file. To do this, type the following into the command prompt and press enter:
nano $HOME/.ssh/authorized_keys
You will now be editing your authorized_keys file. There will likely already be entries for keys that were generated for your account automatically. Please select copy the data from the PuTTYgen window labeled "key" to your clipboard. Use the arrow keys to navigate to the bottom of the list in the authorized_keys file and paste the data from the PuTTYgen window into this file. All the pasted content should be on one line. The figure below shows the window after pasting the additional line of information.
authorized_keys after adding additional line
Please use right click to copy and paste since that will produce the best results. After you have pasted the information in the file, press the CTRL and o keys at the same time followed by Enter to write out the file. Then press the CTRL and x keys at the same time to exit the editor.
Congratulations your key is now authorized to login to your account on HPG.
Using Pageant to create persistent key sessions
In order to take the most advantage of key-based authentication, the most common use is a persistent password-less connection.
If you installed the PuTTY system via the msi, then all the associations are typically set up for you. Simply double click your private key file and enter your key password to load your key into the agent.
Once loaded, you can double click the icon in the lower right tray and it will show you the fingerprints of the keys you have loaded.
This will allow PuTTY to connect without having to enter your password.
If you are using MobaXterm you can enable the use of the Pageant to pick up your key. The setting can be found under “Settings" then “SSH". The setting needed is the “Use external Pageant". The figure below shows this in the settings menu.
MobaXterm settings for Pageant
When you are done with your session, please remember to log out or remove the key from Pageant. This can be done easily by double clicking the Pageant tray icon, click the key you want to remove and then click “Remove Key".


