Galaxy Data Import: Difference between revisions
Moskalenko (talk | contribs) |
Moskalenko (talk | contribs) |
||
| Line 47: | Line 47: | ||
=Inside the Galaxy= | =Inside the Galaxy= | ||
==Create a data sub-folder== | ==Create a data sub-folder== | ||
* Click on the downward pointing triangular icon immediately to the right of '''your''' folder name to access the Folder Menu and select either "Add sub-folder" if you wanted to organize your data folders. If you miss this step and end up uploading your data into the main folder of the "Incoming Data" library please click on the triangular drop-down menu symbol on the right side of the dataset name and select "Move this dataset". Select your own folder as the destination and click "Move". Please upload your datasets into your own folder to keep the main data library folder clean. | * Click on the downward pointing triangular icon immediately to the right of '''your''' folder name to access the Folder Menu and select either "Add sub-folder" if you wanted to organize your data folders. If you miss this step and end up uploading your data into the main folder of the "Incoming Data" library please click on the triangular drop-down menu symbol on the right side of the dataset name and select "Move this dataset". Select your own folder as the destination and click "Move". Please upload your datasets into your own folder to keep the main data library folder clean. | ||
Revision as of 19:57, 14 August 2018
Introduction
Small files residing on your local machine can be easily added to a Galaxy history through the "Get Data>Upload File" tool.
However, larger files may take too long to upload directly into galaxy and all files over 2gb in size cannot be uploaded via the web browser. Those files need to be transferred to the UFRC and put under '/ufrc/apps/galaxy/incoming/your@email' directory.
- New
The Get Data > Upload File' tool shows all files under /ufrc/apps/galaxy/incoming/your@email listed in the upload interface. Simply click on the checkboxes in front of the files you want to upload and then click on the 'Execute' button and the upload should commence. Once you uploaded the files please remove them from /ufrc/apps/galaxy/incoming/your@email. The above approach should be much simpler and faster than using the Large Data Upload procedure through the Incoming data library and doesn't require any changes. Please give the system at least 15 minutes to fix permissions on the newly uploaded files if they are not readable by the galaxy user.
Note: The "Incoming" library must only be used to upload data, not for storage. Please delete the uploaded datasets once they've been imported into histories. All datasets and folders in the "Incoming" shared data library may be deleted after a period of 30 days if they weren't cleaned up by the owner.
Outside of Galaxy
If the simplified upload procedure is not working then proceed with using the Incoming data library. The first part of getting a large dataset into Galaxy is to make it available to the Galaxy
Galaxy Username
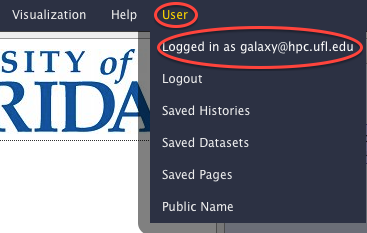
- Find out your Galaxy username. Click on the "User" menu and read the "Logged in as user@hostname" line.
Create your Galaxy incoming directory
If your Galaxy username is "jdoe@ufl.edu" then the incoming directory you need to create is /ufrc/apps/galaxy/incoming/jdoe@ufl.edu
mkdir /ufrc/apps/galaxy/incoming/jdoe@ufl.edu
Copy data to the Galaxy incoming directory
- Note
- You can use either command-line or GUI tools like FileZilla to transfer your data to HiPerGator for upload into Galaxy.
- Copy your data directory to the HPC directory /scratch/galaxy/incoming/user@hostname.
For instance, if your Galaxy username is "jdoe@ufl.edu" then your data directory must be copied to /ufrc/apps/galaxy/incoming/jdoe@ufl.edu, so in the end the data files will be inside the
/ufrc/apps/galaxy/incoming/jdoe@ufl.edu/data_dir
directory. Substitute your actual Galaxy username and the name of the directory you copied for "jdoe@ufl.edu" and "data_dir".
- Make sure the files are readable by setting the correct access mode
Set the 755 mode for the directory and 644 for the files either from within the software you used for transferring the files or by logging into HPC and running the following commands:
cd /ufrc/apps/galaxy/incoming/jdoe@ufl.edu
chmod 755 data_dir
chmod 644 data_dir/*
Notes
- To copy your data you can use scp/sftp or ask Research Computing staff via HPC Support site to get the HPC windows file share access enabled for you, so you could access the "Galaxy" file share that points to the
/ufrc/apps/galaxy/incoming/your@emaildirectory. - The username is your email address. If you don't remember what email address you used for HPC account registration it can always be looked up by clicking on the User item of the Galaxy's main menu.
- Your data files must be in a single sub-directory. For instance, if that sub-directory is called test then the full path to the directory with data files of a user jdoe@ufl.edu must be
/ufrc/apps/galaxy/incoming/jdoe@ufl.edu
You can use any mechanism listed in the Transfer Data help page to copy your data from a local system to your incoming galaxy directory
Inside the Galaxy
Create a data sub-folder
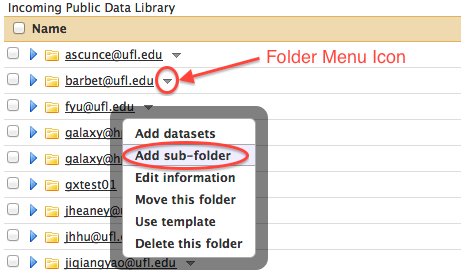
- Click on the downward pointing triangular icon immediately to the right of your folder name to access the Folder Menu and select either "Add sub-folder" if you wanted to organize your data folders. If you miss this step and end up uploading your data into the main folder of the "Incoming Data" library please click on the triangular drop-down menu symbol on the right side of the dataset name and select "Move this dataset". Select your own folder as the destination and click "Move". Please upload your datasets into your own folder to keep the main data library folder clean.
- Fill out the form to create a sub-folder as shown above.
- To navigate the Folder Tree use the solid triangle icons on the left side of the folder names.
Import datasets
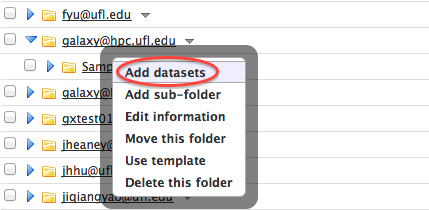
- Click on the Folder Menu of the created sub-folder and click on "Add datasets".
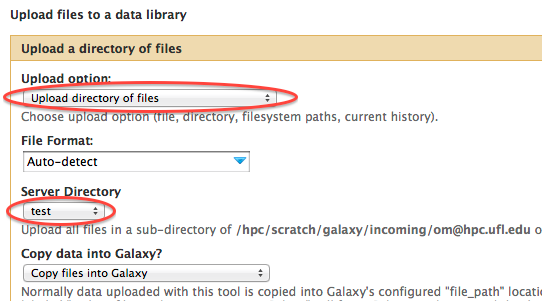
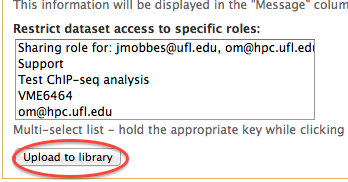
- After you clicked on the "Add datasets" you will be taken to the dataset upload dialog. As a minimum choose "Upload directory of files" in the drop down "Upload option:" menu. Then, choose the data directory name to upload from the "Server Directory" menu. The name reflects the directory you copied your dat into such as /scratch/lfs/galaxy/incoming/user@name/data_directory". In addition, you can use other options in the dataset upload dialog (Convert spaces to tabs, Genome, Message). If you want to restrict access to your dataset select the appropriate roles from the Restrict dataset access to specific roles area.
- Click on the "Upload to library" button at the bottom of the window.
- After the upload is finished you will have you data in your sub-folder of the Incoming data library. You will be able to open that folder and select the appropriate datasets then make sure "Import to current history" action is chosen in the menu underneath the datasets and click on the "Go" button. The datasets will appear in your current history. Now you can do your analyses.
