Difference between revisions of "Globus"
Moskalenko (talk | contribs) |
Moskalenko (talk | contribs) |
||
| Line 5: | Line 5: | ||
= Getting Started = | = Getting Started = | ||
==Getting a Globus Account== | ==Getting a Globus Account== | ||
| − | + | Globus will redirect you to UF GatorLink authentication when you log into [https://globus.org Globus.org]. If you created your globus.org account before Globus started using the new authentication you'll need to [https://docs.globus.org/how-to/link-to-existing/ link] your old globus @globusid.org account with your @ufl.edu account. | |
==Globus Endpoints== | ==Globus Endpoints== | ||
Revision as of 14:50, 1 April 2016
Globus is an easy-to-use, high-performance data transfer tool developed by the Computation Institute, the University of Chicago and Argonne National Laboratory. UF Research Computing has deployed Globus as one mechanism to facilitate data transfer to and from HiPerGator.
Globus uses a grid-FTP network which uses the power of multiple servers to simultaneously transfer data.
Getting Started
Getting a Globus Account
Globus will redirect you to UF GatorLink authentication when you log into Globus.org. If you created your globus.org account before Globus started using the new authentication you'll need to link your old globus @globusid.org account with your @ufl.edu account.
Globus Endpoints
Globus transfers files between two endpoints. An endpoint is one of the two file transfer locations – either the source or the destination – between which files can move. Once a resource (server, cluster, storage system, laptop, or other system) is defined as an endpoint, it will be available to authorized users who can transfer files to or from this endpoint.
Globus endpoints are named using the following format: <globus-online-username>#<endpoint-name>. For example, Research Computing has an account under the username "ufrc" and so it's endpoint is named ufrc#go. Likewise, an individual that has a Globus account under the username "maxim" might have a personal endpoint called maxim#mylaptop.
UF Research Computing Endpoints
ufrc#go --The primary Globus endpoint for users.
ufrc#test --A secondary endpoint largely designed for testing purposes.
A valid UF Research Computing account is required to access either of these endpoints. If you do not have a Research Computing account, you may request one here.
UFRC users have Globus Plus user status, so they are able to create shared endpoints, which do not require a Research Computing account to connect to. In this mode Globus acts as a secure high-performance equivalent of the Dropbox and other similar services. See Globus Sharing documentation to learn how to create shared endpoints in just a few seconds.
Transferring Data Between Endpoints
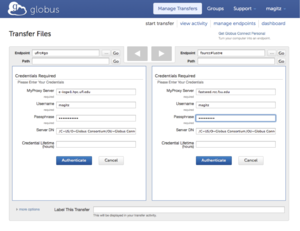
To transfer data between two endpoints, log in to your account at Globus.org. In the Quick Links drop down, select Transfer Files. Enter the endpoint information and, if needed, authentication information for each endpoint. The example below, shows settings for a transfer between ufrc#go and the FSU Research Computing endpoint fsurc#lustre
After authenticating at both endpoints, navigate to the folder and select the files to transfer and click the arrow corresponding to the direction of the transfer. The transfer will be scheduled and you will receive an email when the transfer has completed.
Advanced Transfer Options
At the bottom of the transfer window, click the More Options link. The drop down will display advanced transfer options. Many of these are useful for file synchronization. There is also an option to encrypt the data transfer, an important option for sensitive data.
Globus Connect Personal
It is possible to transfer data to and from your own computer using the Globus Connect Personal Client. Select Manage Endpoints from the Manage Data drop down, and click the add Globus Connect Personal. Name the endpoint and click the Generate Setup Key. Copy that key. Download and start the install process for the client for your operating system. When prompted, paste the Setup Key into the installation box.
To transfer data to and from your computer, the Globus Connect Personal client must be running. Select it as one of the endpoints for your transfer.
Additional information
For additional support information, please see the Globus Support Site, especially the Quick Start Guides and FAQs.
