Difference between revisions of "Federated login"
Jump to navigation
Jump to search
| Line 4: | Line 4: | ||
{{Note|Note that the processes described on this page are for individual researchers only. Instructors and students in a course will be handled in a different mechanism.|warn}} | {{Note|Note that the processes described on this page are for individual researchers only. Instructors and students in a course will be handled in a different mechanism.|warn}} | ||
| − | Federated login is available for most [https://incommon.org/ InCommon member institutions], you can verify that your institution provides | + | Federated login is available for most [https://incommon.org/ InCommon member institutions], you can verify that your institution provides federated authentication using [https://incommon.org/community-organizations/ this page] and looking for the "Federation" tag. |
| − | ==Establishing a HiPerGator Account | + | ==Establishing a HiPerGator Account Using Federated Credentials== |
===COmanage registration=== | ===COmanage registration=== | ||
# Start here: https://federation.it.ufl.edu/registry/co_petitions/start/coef:6 | # Start here: https://federation.it.ufl.edu/registry/co_petitions/start/coef:6 | ||
| − | # Select institution to log in with, which will forward you to your institution's SSO page. [[File:COmanage1.png|frame|center|The COmanage registration page: enter your institution]] | + | # Select institution to log in with, which will forward you to your institution's single sign on (SSO) page. [[File:COmanage1.png|frame|center|The COmanage registration page: enter your institution]] |
# After logging in, you will be presented with a form and need to fill out the following info: [[File:COmanage2.png|frame|right|The COmanage user registration page]] | # After logging in, you will be presented with a form and need to fill out the following info: [[File:COmanage2.png|frame|right|The COmanage user registration page]] | ||
## Given Name | ## Given Name | ||
| Line 25: | Line 25: | ||
Follow these instructions for creating a public/private key pair on your local computer depending on your OS: | Follow these instructions for creating a public/private key pair on your local computer depending on your OS: | ||
* [[Using_SSH_Keys_To_Access_HPG#MacOS|Creating an SSH key on MacOS]] | * [[Using_SSH_Keys_To_Access_HPG#MacOS|Creating an SSH key on MacOS]] | ||
| + | ** Run the command: <code>ssh-keygen -o -a 100 -t ed25519 -f ~/.ssh/id_ed25519 -C "Comment to make the key recognizable among many"</code> | ||
* [[Create SSH keys on Windows|Creating an SSH key on Windows]] | * [[Create SSH keys on Windows|Creating an SSH key on Windows]] | ||
* [[Using_SSH_Keys_To_Access_HPG#Linux|Creating an SSH key on Linux]] | * [[Using_SSH_Keys_To_Access_HPG#Linux|Creating an SSH key on Linux]] | ||
| + | ** Run the command: <code>ssh-keygen -o -a 100 -t ed25519 -f ~/.ssh/id_ed25519 -C "Comment to make the key recognizable among many"</code> | ||
The private key file should remain on your computer and not be shared with anyone. The public key file will be uploaded in the next step. | The private key file should remain on your computer and not be shared with anyone. The public key file will be uploaded in the next step. | ||
| − | # After creating your SSH key and receiving the email invitation, click the link | + | # After creating your SSH key and receiving the email invitation, click the link in the email |
# Review the Terms and Conditions, click "I Agree" and "Submit". | # Review the Terms and Conditions, click "I Agree" and "Submit". | ||
| − | # Click Choose File, select a public key (ends in .pub) and click "Upload" | + | # Click Choose File, select a '''public''' key (ends in .pub) and click "Upload" |
# Once the SSH key has been uploaded, the account request process will proceed. The sponsor will be notified of the account request and will need to approve the request. At that point, the HiPerGator account can be created. | # Once the SSH key has been uploaded, the account request process will proceed. The sponsor will be notified of the account request and will need to approve the request. At that point, the HiPerGator account can be created. | ||
# Once your HiPerGator account has been created you will receive an email. At this point you will be able to connect to HiPerGator. | # Once your HiPerGator account has been created you will receive an email. At this point you will be able to connect to HiPerGator. | ||
| Line 42: | Line 44: | ||
# Select your institution from the dropdown and click Select. This will forward you to your institution's SSO page. | # Select your institution from the dropdown and click Select. This will forward you to your institution's SSO page. | ||
# After logging in, approve eduVPN access. You will now be connected to our instance of eduVPN. | # After logging in, approve eduVPN access. You will now be connected to our instance of eduVPN. | ||
| − | # SSH to hpg.rc.ufl.edu using your SSH key. | + | # SSH to hpg.rc.ufl.edu using your SSH key: |
| + | ## Your username will be indicated in the email you receive when your account is created. | ||
| + | ## For command line: <code>ssh -p 2222 username@hpg.rc.ufl.edu</code> | ||
| + | ## For additional details, see [[Using SSH Keys To Access HPG]] | ||
Revision as of 12:29, 1 September 2022
For users outside of the University of Florida, UF Research Computing has setup federated authentication so that users can access HiPerGator resources using their institutional credentials.
Note that the processes described on this page are for individual researchers only. Instructors and students in a course will be handled in a different mechanism.
Federated login is available for most InCommon member institutions, you can verify that your institution provides federated authentication using this page and looking for the "Federation" tag.
Establishing a HiPerGator Account Using Federated Credentials
COmanage registration
- Start here: https://federation.it.ufl.edu/registry/co_petitions/start/coef:6
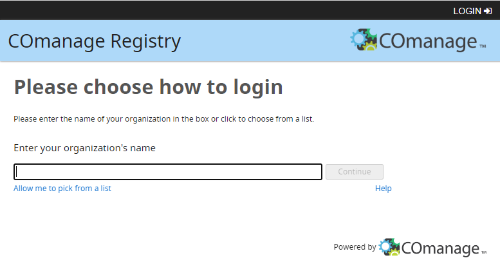
- Select institution to log in with, which will forward you to your institution's single sign on (SSO) page.
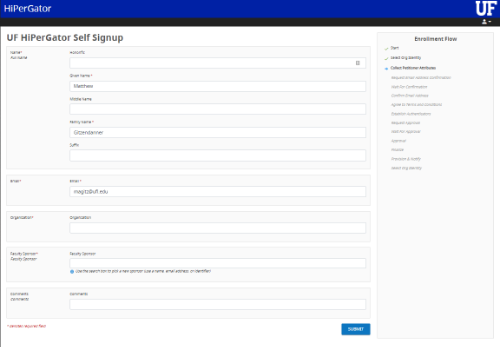
- After logging in, you will be presented with a form and need to fill out the following info:
- Given Name
- Family Name
- Organization (i.e. institution name)
- Select a sponsor from the drop down.
- Add any comments they think are helpful for UFRC staff.
- Click Submit
- An email will be sent to you for the next steps.
Create SSH keys and upload public key for access
Follow these instructions for creating a public/private key pair on your local computer depending on your OS:
- Creating an SSH key on MacOS
- Run the command:
ssh-keygen -o -a 100 -t ed25519 -f ~/.ssh/id_ed25519 -C "Comment to make the key recognizable among many"
- Run the command:
- Creating an SSH key on Windows
- Creating an SSH key on Linux
- Run the command:
ssh-keygen -o -a 100 -t ed25519 -f ~/.ssh/id_ed25519 -C "Comment to make the key recognizable among many"
- Run the command:
The private key file should remain on your computer and not be shared with anyone. The public key file will be uploaded in the next step.
- After creating your SSH key and receiving the email invitation, click the link in the email
- Review the Terms and Conditions, click "I Agree" and "Submit".
- Click Choose File, select a public key (ends in .pub) and click "Upload"
- Once the SSH key has been uploaded, the account request process will proceed. The sponsor will be notified of the account request and will need to approve the request. At that point, the HiPerGator account can be created.
- Once your HiPerGator account has been created you will receive an email. At this point you will be able to connect to HiPerGator.
HiPerGator SSH Access via eduVPN
In order to access HiPerGator via SSH with a federated account you will need to connect via eduVPN.
- Download the latest version of the eduVPN client from https://www.eduvpn.org/client-apps/ and install it.
- After installing the eduVPN client, open the application.
- Search for and select the University of Florida. You will be presented with an InCommon login page.
- Select your institution from the dropdown and click Select. This will forward you to your institution's SSO page.
- After logging in, approve eduVPN access. You will now be connected to our instance of eduVPN.
- SSH to hpg.rc.ufl.edu using your SSH key:
- Your username will be indicated in the email you receive when your account is created.
- For command line:
ssh -p 2222 username@hpg.rc.ufl.edu - For additional details, see Using SSH Keys To Access HPG

